Kindest Dancing Gnomes Creative Fold Card
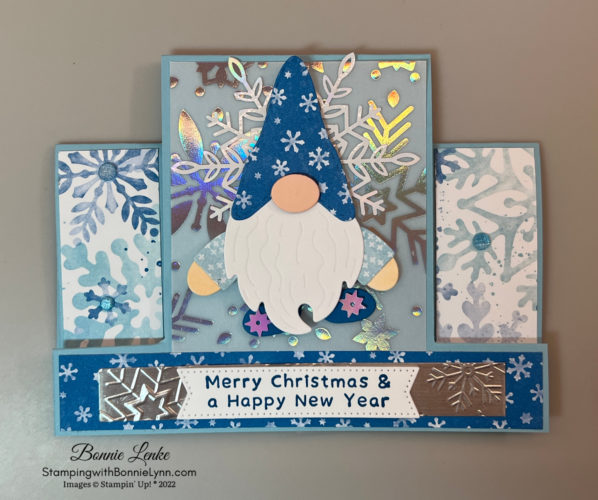
The Stampin’ Up! Kindest Gnomes Bundle has such character to it. The Gnome dies allow you to make a Gnome and put it together as you desire. This one I’m showing you happens to dance. I found this technique from Kate Morgan in Victoria Australia.
I love all the talent that is out there between the Stampin’ Up! Demonstrators and our customers and that we all share it with one another. This step up Creative Fold is one I have enjoyed making for a number of years.
I think that I might give this card to my sweet Grandson for Christmas. He would get a kick out of it plus he saves all his cards. I wish both grandchildren lived closer so we could make cards together. I hope you enjoy this card as much as I enjoyed making it.
I made a template for this card and it will appear when you “CLICK FOR DIRECTIONS”. Sorry I couldn’t get it to show up on the website. If someone knows how to do that I would love to know how to do it.
CLICK TO SEE DANCING GNOMES VIDEO
Let’s Get Started
- Make the slits on the Balmy Blue Card Base. To make the slits place your cardstock in the trimmer in portrait position. Place the left side on the 1-1/4” mark. Make a slit from the 1” mark to the 5-1/4” mark. Move the cardstock to the 4-1/4” mark and make another slit from the 1” mark to the 5-1/4” mark. (Template is attached)
- Turn your cardstock so the long 8-1/2” side is against the top of trimmer with the slits on the left side. Place your cardstock on the 1” mark and score from the top to the slit only. DO NOT SCORE BETWEEN THE SLITS. Now move your score blade to the bottom on cardstock and score from the bottom to the slit.
- Move the cardstock to the 2” mark and repeat the process of scoring from the top to the slit and from the bottom to the slit. DO NOT SCORE BETWEEN THE SLITS.
- Place your cardstock on the 4-1/4” mare and this time score ONLY BETWEEN THE SLITS.
- Once more move the cardstock to the 5-1/4” mark. Score from the top to the slit. Move to the bottom and score from the bottom to the slit. DO NOT SCORE BETWEEN THE SLIT LINES.
- Fold the card base as shown on the video.
- Adhere the Snowflake Vellum to the middle front panel by using Glue Dots where they won’t show through, such as behind the snowflakes (this is cut long on purpose to run under the bottom strip).
- Add the Storybook Gnomes Strips to each side of the card front with your favorite adhesive.
- Next adhere the long strip of Storybook Gnomes DSP to the bottom of the card front.
- Emboss your Silver Foil Strip using the Snowflake Wintry 3D Embossing Folder. Add bottom of card front. Stamp you Greeting in Pacific Point Ink onto White Cardstock, cut out with Stylish Shape Die and center over foil strip with Dimensionals.
- Cut off most of the bottom part of a Wonderful Snowflake and add to card front with a Glue Dot (hint: keep top of snowflake from going over the top edge of paper unless you use oversized envelopes.)
- For the mechanism to make the legs move cut out the top part on the 3/4” x 1-1/4” White Cardstock with the nose die from the Gnomes Dies. See picture. Glue this to the top of the pants you cut out in Pacific Point cardstock with the Gnomes Dies. Position this on the card front with the legs hanging straight down and just above the bottom strip on card front. Put a Mini-Dimensional in the middle of the hole on the white cardstock. This is how the legs will move.
- Note: A second way of making the mechanism is demonstrated in the video. I used the rectangular die with a hole on each end and cut off the sides to make an even piece with a hole on each end. You then cut it in half and have 2 mechanisms to use just as the one you made above.
- Put the rest of the Gnome together. Color the arms with a skin tone blend then glue to underneath side of sleeve (mushroom cap) for both arms. Glue both of these to back side of Beard (cut out of white cardstock with Gnomes Dies). Glue hat to beard going just below the lines on the beard. Pop the Petal Pink Nose up with a Mini-Dimensional to Gnome so it goes a little over bottom of hat. (Optional – add nose with glue dot or liquid glue prior to adhering hat to beard so part of nose is covered). Add Mini-Dimensionals to back of hat as shown in video and in picture. Add this piece to card front making sure you cover the mechanism completely with the beard and remember to remove the paper off the top of the Mini-Dimensional that works the mechanism.
- Add Adhesive Backed Stars to each shoe. Add some Fine Sparkle Adhesive Backed Gems to Card Front.
- In place of adding cardstock to inside of the card I put it on the back of the card. Stamp your saying from the Christmas to Remember stamp set in Pacific Point Ink then adhere to card back. To finish the envelope I added a piece of the Storybook Gnomes DSP to the back flap.
And now you have a beautiful card to brighten someone’s day.
Happy Stamping!


Card Recipe
Cardstock:
- Balmy Blue: 5-1/2” x 8-1/2” Card Base
- Basic White: 3/4” x 1-1/4” mechanism, 3-1/4” x 7/8” greeting, 2-1/4” x 2-1/4” beard and arms, 3” x 5-1/4” Card Back
- Storybook Gnomes DSP: 1-1/2” x 2-1/2” hat, 5-3/8” x 7/8” bottom strip, (2) 1-1/8” x 3-1/8” for side strips, scraps for sleeves
Supplies Used:
- Stamps: Kindest Gnomes, Christmas to Remember
- Dies: Gnome Dies, Stylish Shape Dies
- Cardstock/Paper: Balmy Blue, Basic White, Petal Pink, Storybook Gnomes DSP
- Stampin Pads: Pacific Point
- Blends: Petal Pink for nose if you cut it out of white cardstock, Skin tone for arms
- Embellishments: Adhesive Backed Stars, Fine Sparkle Adhesive Backed Gems
- Adhesives: Dimensionals, Glue Dots, Liquid Glue, Tear N Tape, Stampin Seal
- Tools: Paper Trimmer, Cut & Emboss Machine, Clear Blocks, Take Your Pick, Bone Folder, Paper Snip Scissors
CURRENT HOST CODE: ZU2TGXSX
Earn Reward Points quickly for a $25 Credit
When placing an order please use the current Host Code* and earn REWARD POINTS. Once you earn 10 reward points you will receive a $25 shopping credit from me. CLICK HERE for more details.
*NEWEST HOST CODE is always located on the right side of webpage midway down.
Paper Pumpkin – November’s Kit
Time is Running Out to Order
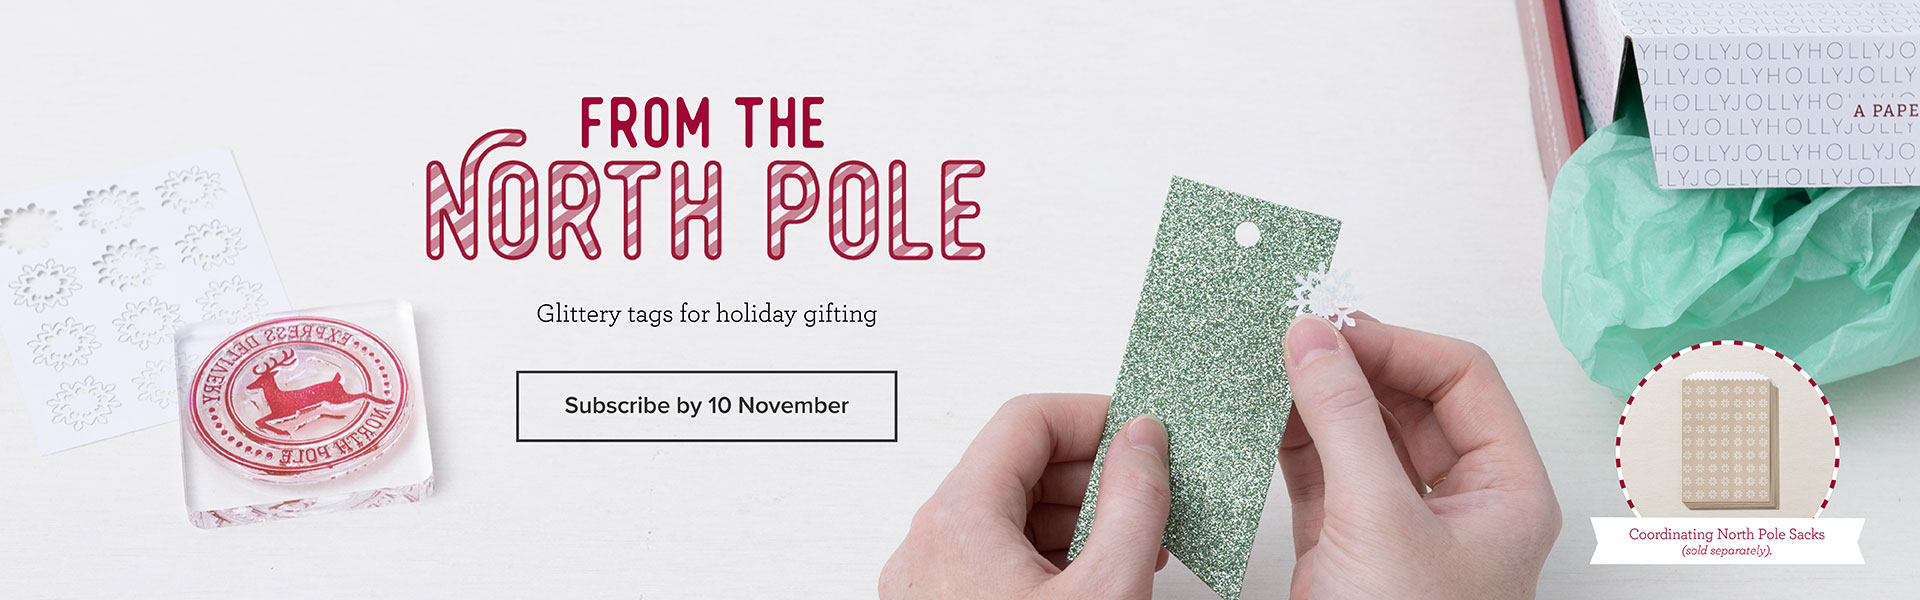
When autumn rolls around, do you start thinking about cozy Christmas crafting projects? This November, Paper Pumpkin delivers this and more with its one-of-a-kind, holiday-themed crafting experience. This festive kit includes 12 fun, sparkly gift tags and (as always!) an exclusive stamp set—plus everything you need for a successful holiday crafting experience.
SAVE TIME WITH AN ALL-INCLUSIVE CHRISTMAS TAG KIT
Our From the North Pole Kit is a great way to add a DIY touch to this year’s holiday gifting and still save so much time! This kit has everything you need to make 12 sparkling, handmade tags—without the fuss!
Need unique Christmas packaging to round out your gifting? We’ve got you covered with our exclusive North Pole Sacks add-on. Keep reading to learn more!
SUBSCRIPTION INFORMATION
Subscribe to the November Paper Pumpkin Kit between 11 October and 10 November at paperpumpkin.com!
Note: Supplies may be limited toward the end of the subscription period.