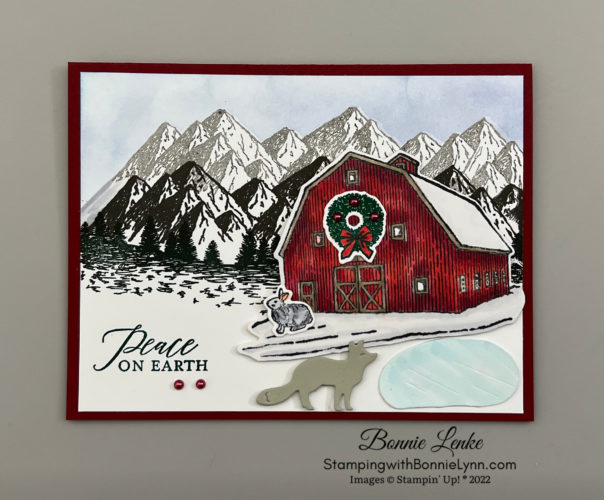
Christmas Barn and Mountain Air Card
I had planned to share a card and video with you today but my clumsiness got into the way and unfortunately there will not be one this week. My feet slide right out from underneath me the other day and now rest is needed. It’s amazing what a small amount of snow and rain can do. Thankfully nothing was broken but it did change my plans.
In place of standing to do a video, coloring the Christmas Barn sounded much less painful. So I grabbed my Stampin’ Blends and tried out different looks. I’m sharing both of the cards with you and you can let me know which one you like more, I’m undecided which is my favorite.
Also helping out is the Mountain Air stamp set and Regal Reindeer bundle. A frozen pond was definitely needed so on the Cherry Cobble Barn I adjusted one of the die cuts from the Bundle to make my pond. On the Soft Suede Barn I hand drew my pond. Both are totally different from each other.
I hope you enjoy these cards as much as I enjoyed making them. Please feel free to share your pictures to my Facebook Page, Stamping With Bonnie-Lynn under the Christmas Barn post.
Let’s Get Started
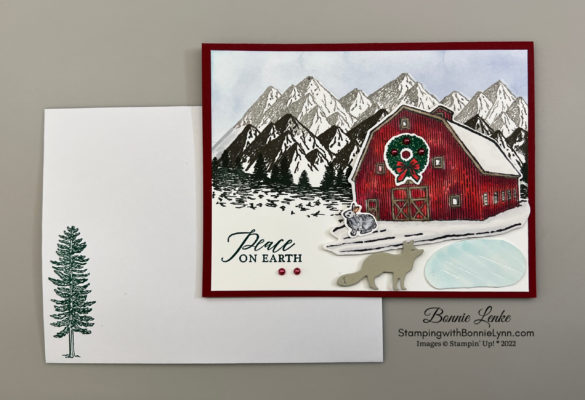
- Stamp the Barn in Memento Black Ink onto Basic White Cardstock and the wreath in Shaded Spruce Ink. It’s also a good time to stamp the rabbit from the Regal Reindeer bundle in Memento Black Ink onto white cardstock. Using Stampin Blends in Cherry Cobbler and Sweet Sorbet color the body of the Barn. The trim and doors are colored with Light Soft Suede. The rabbit was colored using Smoky Slate and the Blender Pen. Petal Pink for the inside of the ears. (Hint: After adding a small amount Smoky Slate to the Rabbit I picked some color up off the light Smoky Slate with the Blender Pen for blending on the rabbit. Using the same technique add some very light Smoky Slate around the ground of the barn (it’s to make it look like snow drifts). I also used this same technique on the pond with the Balmy Blue to obtain a much lighter blue color). I colored the wreath with the Light Granny Apple Green Blend to add more dimension to the wreath. Color the wreath ribbon with Sweet Sorbet Blends. Cut out all 3 pieces with their co-ordinating dies.
- On the Basic White Cardstock panel stamp the mountains in Early Espresso Ink then stamp again without re-inking and offset. (On the Soft Suede Barn card I stamped off once before stamping the White Cardstock then proceed as above for lighter mountains). Stamp the tree line in Evening Evergreen Ink.
- Cut the mountains out of Masking Paper using the Majestic Mountain dies and cover the top mountains leaving just a hairline showing. Use a Blending Brush and Balmy Blue Ink to blend your sky leaving some light spots. You need to shift the mask over so you can blend the white space on the opposite side of the mountains (you’ll see what this means when you take the mask off).
- Using Shaded Spruce Ink stamp your Greeting to the left side of the card.
- For the Pond I used the oblong shaped die from the Barn Dies and cut it out on White Cardstock. I then cut it down in the middle with the Paper Snips, rounding the edge. Use the Balmy Blue Blend and the Blender Pen to add color to the pond. The shiny look is from Shimmer Crystals Effects (retired) that I spread over the surface. In place of Shimmer Crystals you can heat emboss with clear embossing powder.
- Fold the Cherry Cobbler card base in half on the score line and burnish with Bone Folder.
- Adhere your White Cardstock panel with Mountains onto card base with your favorite adhesive.
- Use Dimensionals to adhere Barn to card front. Add the wreath to the barn with Glue Dots.
- The pond is adhere with Stampin Seal.
- Cut the coyote, a Regal Reindeer Die, from Sahara Sand Cardstock. Adhere to card front with Dimensionals.
- Add Red Festive Pearls to the wreath and below the Greeting.
- For the card inside I stamped the Mountain Air mountains in Early Espresso Ink after stamping off two times. The saying is from the Hope and Peace stamp set and stamped in Cherry Cobbler Ink onto White Cardstock.
- The Envelope is stamped with the tree from the Christmas Barn stamp set in Shaded Spruce Ink.
And now you have a beautiful Christmas card to brighten someone’s Holiday Season.
Happy Stamping!


Additional details for the Soft Suede Barn – The card stocked used is Shaded Spruce and the Greeting is stamped in Cherry Cobbler Ink. The barn was colored with the Soft Suede and Crumb Cake Blends with the trim in Shaded Spruce. The trees were stamped in Shaded Spruce. The little girl’s coat is colored in Sweet Sorbet, Crumb Cake (fur), Shaded Spruce light and Soft Suede on the boots. Saying on the card inside is from Christmas to Remember stamped in Shaded Spruce Ink.
PRINT CHRISTMAS BARN CARD DIRECTIONS
Card Recipe
Cardstock:
- Cherry Cobbler: 5-1/2” x 8-1/2” scored at 4-1/2”
- Basic White: 5-1/4” x 4” (2) for card front and inside, 4” x 5” for stamping
- Sahara Sand: ScrapSupplies Used:
- Stamps: Christmas Barn, Mountain Air, Regal Reindeer, Hope and Peace, Christmas to remember (for the Soft Suede Barn inside)
- Dies: Barn Dies, Majestic Mountain Air and Reindeer Dies
- Cardstock/Paper: Basic White Thick, Basic White, Cherry Cobbler, Shaded Spruce, Sahara Sand
- Stampin Pads: Early Espresso, Evening Evergreen, Shaded Spruce, Cherry Cobbler, Balmy Blue, Memento Black
- Stampin’ Blends: Soft Suede, Crumb Cake, Cherry Cobbler, Sweet Sorbet, Shaded Spruce, Granny Apple Green, Balmy Blue, Smoky Slate and Blender Pen. I also used Copic Colors B0000, B000, C0, C1, C3
- Embellishments: Festive Pearls, Shimmer Crystal Effects (retired)
- Adhesives: Dimensionals, Glue Dots, Liquid Glue, Tear N Tape, Stampin Seal
- Tools: Blending Brushes, Paper Trimmer, Cut & Emboss Machine, Clear Blocks, Take Your Pick, Bone Folder, Stampin Pierce Mat, Paper Snip Scissors