MERRY CHRISTMAS
Wishing you Merry Christmas from the Caroling Mice and myself. I hope you have a wonderful Christmas and enjoy celebrating it with your family and friends. May the peace of the Savior be with you. I would also like to thank everyone who has supported my business this year. I appreciate the faith you have put in me to be your Stampin’ Up! Demonstrator, it means a lot to me. Thank you to everyone who visits and/or follows my web page, YouTube, Pinterest, Instagram and Facebook. I appreciate and cherish everyone of you.
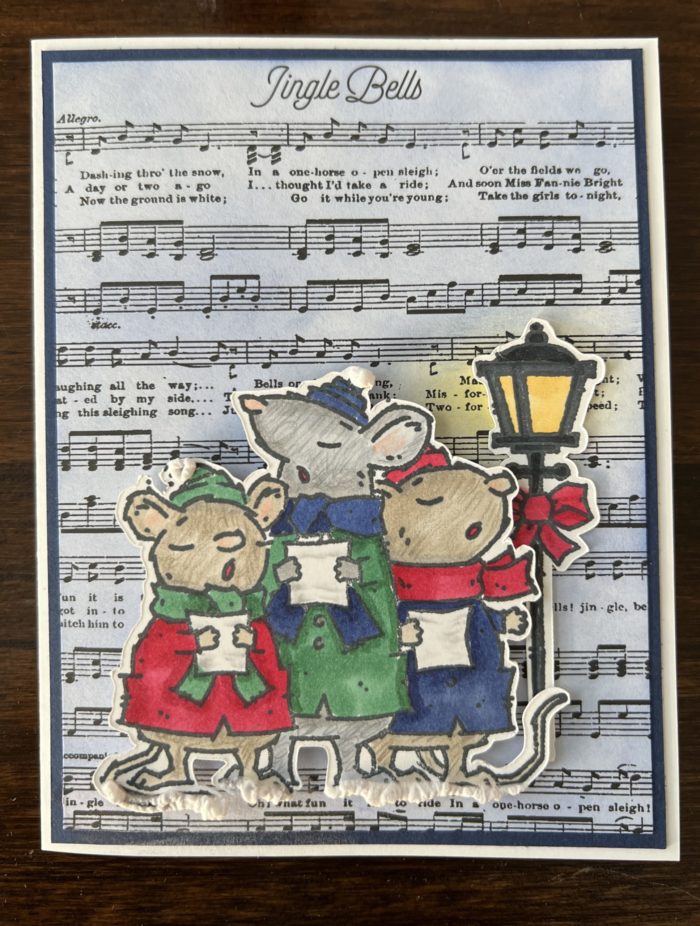
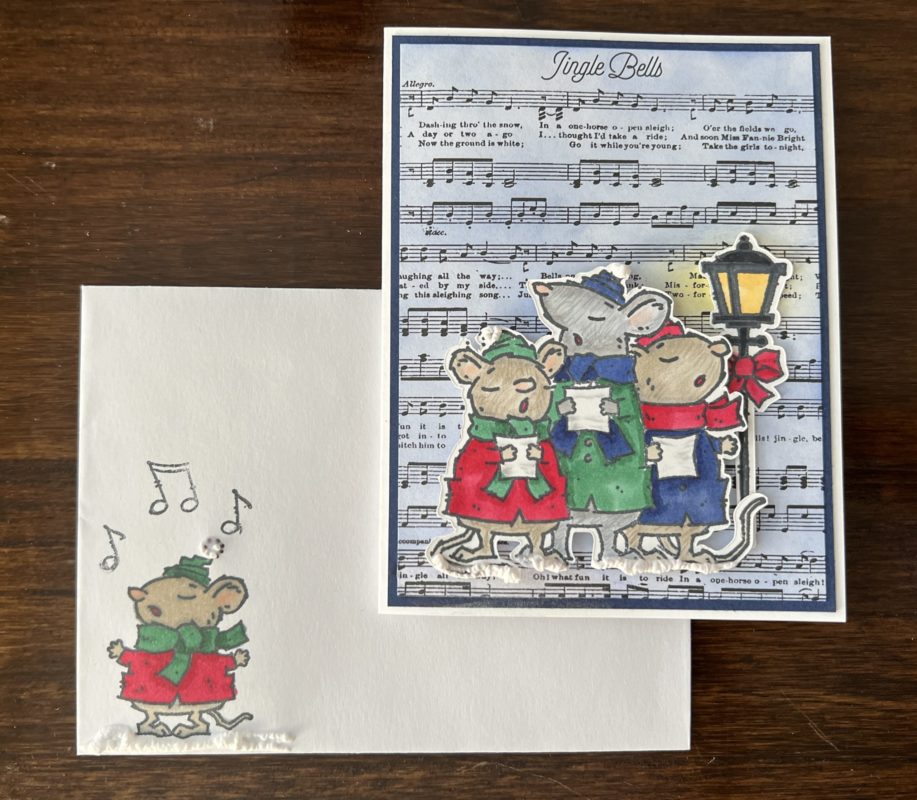
Caroling Mice Christmas Card

I made this card for my husband for Christmas. He loves critters and I know he’ll enjoy these little guys. The designer series paper I used for this card is retired and is the Merry Music Specialty DSP. I thought it was perfect for singing mice. If I didn’t have this paper I would had used the Merry Melody Embossing Folder on White Cardstock and with the Blending Brushed add some Starry Sky Ink lightly to the surface.
I used Stampin’ Blends for the coloring then I went over the mouse with a color pencil to make them look like they had fur. They looked too pretty for a critter lover without the color pencil. I hope you enjoy this card as much as I enjoyed making it.
PRINT CARD DIRECTIONS
Let’s Get Started
- Using the Stamparatus stamp the mice and the lamppost on White Cardstock with Black Memento Ink.
- Color the mice with your favorite Stampin’ Blends or a medium of your choosing. For the middle mouse I used Light Smoky Slate. I also used my Copic’s C1 & C3 to blend the ink. Color the inner ear and the nose with Light Petal Pink ink then very lightly go over the petal pink with the light smoky slate (do this with the other 2 mice only using the light crumb cake over the petal pink). If you don’t have Copic Markers you use your Blender Pen and Dark Smoky Slate to blend the inks. You do this by rubbing the tip of your blender pen against the tip of the dark smoky slate and then blend with the light smoky slate on the paper.
- The other two mice are colored with the light Crumb Cake blends. First I did a layer of light smoky slate where I wanted the shading on the mice. I then went over it with the light crumb cake ink. Where needed I added another layer of light crumb cake.
- For the mouth I colored it with the Light Real Red Blend. Coats were done in the Light and Darks of the following Blends – Real Red, Starry Sky and Shaded Spruce. These were also the colors I used on the scarfs and hats.
- The lamp post was colored with Light & Dark Basic Black and the light area I used Light & Dark So Saffron. Fussy cut out the mice and lamp post.
- Adhere a panel of Night of Navy Cardstock to the card front.
- Next I added a light layer of So Saffron Ink to the Designer Series Paper where the light of the lamp post will be. For the rest use Starry Sky Ink with a Blending Brush. If you don’t have a designer series paper to use you can embossed a panel of White Cardstock with the Merry Melody 3D Embossing Folder. Adhere to Card Front.
- Using Glue Dots add the Lamp Post to Card Front. Add the mice using Dimensionals.
- Since my DSP said “Jingle Bells” at the top I didn’t need to a greeting. If I did I would stamp one in Black Memento or Starry Sky Ink onto White Cardstock and cut out with the small Stitched Rectangle Die.
- Use the Snowfall Accents Puff Paints to put a White ball on the top of the two mice on the left and center and under the mice. You shake the Puff Paint up and add the liquid, not in a straight line. Heat with a Heat Tool till the liquid puffs up.
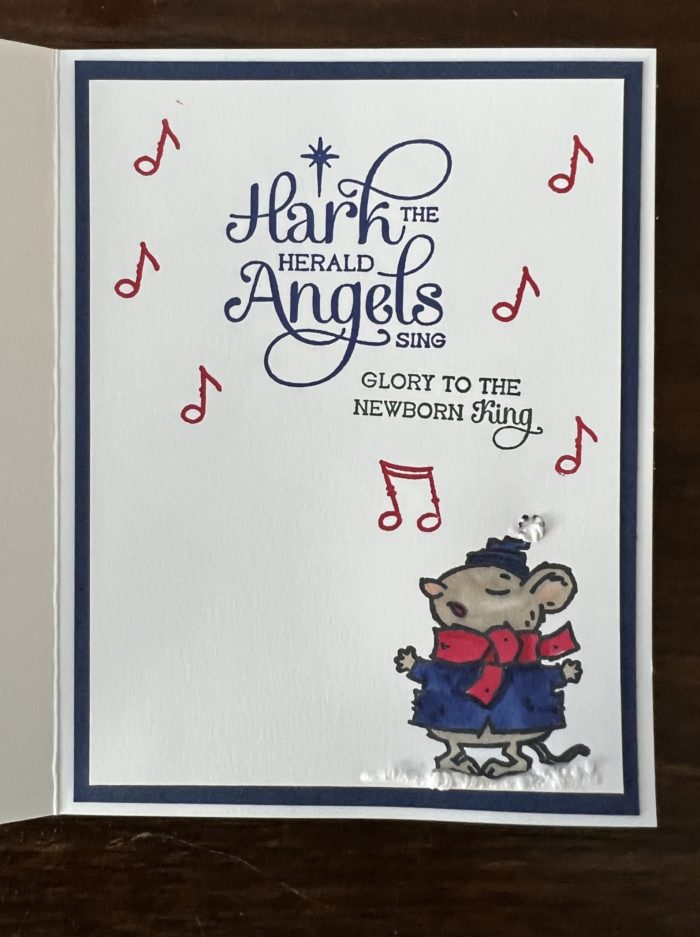
- For the inside I stamped the “Hark the Herald Angels Sing” in Starry Sky Ink onto White Cardstock and “Glory To The Newborn King” in Shaded Spruce Ink. The music notes I stamped using Real Red Ink. The mouse was stamped using Black Memento Ink and colored as the front ones were colored. I also used the Snowfall Accents Puff Paint on the hat ball and under the mouse.
- Put a piece of plastic in the envelope underneath where the mouse is being stamped. This is to keep the Blends from bleeding through to the back side. Stamp the mouse in Black Memento Ink and then color as you did the other mice.
And now you have a Christmas card to brighten a special someone’s day.
Happy Stamping!
Card Recipe
Cardstock:
- Basic White Thick: 8-1/2” x 5-1/2” (card base)
- Basic White: 3-3/4” x 5” (inside)
- Night of Navy: 4-1/16th” x 5-5/16th” (card front), 4” x 5-1/4” (inside)
- Merry Music Specialty DSP: 3-7/8” x 5-1/8”
Supplies Used:
- Stamps: Caroling Mice, For Unto Us (retired 2020)
- Cardstock/Paper: Basic White Thick, Basic White, Night of Navy, Merry Music Specialty DSP
- Stampin Pads: Real Red, Starry Sky, Shaded Spruce, Memento Black Ink
- Stampin’ Blends: Light Petal Pink, Light Crumb Cake, Light & Dark of following colors: Real Red, Starry Sky, Smoky Slate, Basic Black, Shaded Spruce
- Embellishments: Snowfall Accents Puff Paints
- Adhesives: Dimensionals, Glue Dots, Liquid Glue, Tear N Tape, Stampin Seal
- Tools: Paper Trimmer, Heat Tool, Stamparatus, Clear Blocks, Take Your Pick, Bone Folder, Stampin Pierce Mat, Paper Snip Scissors
Earn Reward Points quickly for a $25 Credit
When placing an order please use the current Host Code* and earn REWARD POINTS. Once you earn 10 reward points you will receive a $25 shopping credit from me. CLICK HERE for more details.
*NEWEST HOST CODE is always located on the right side of webpage midway down.