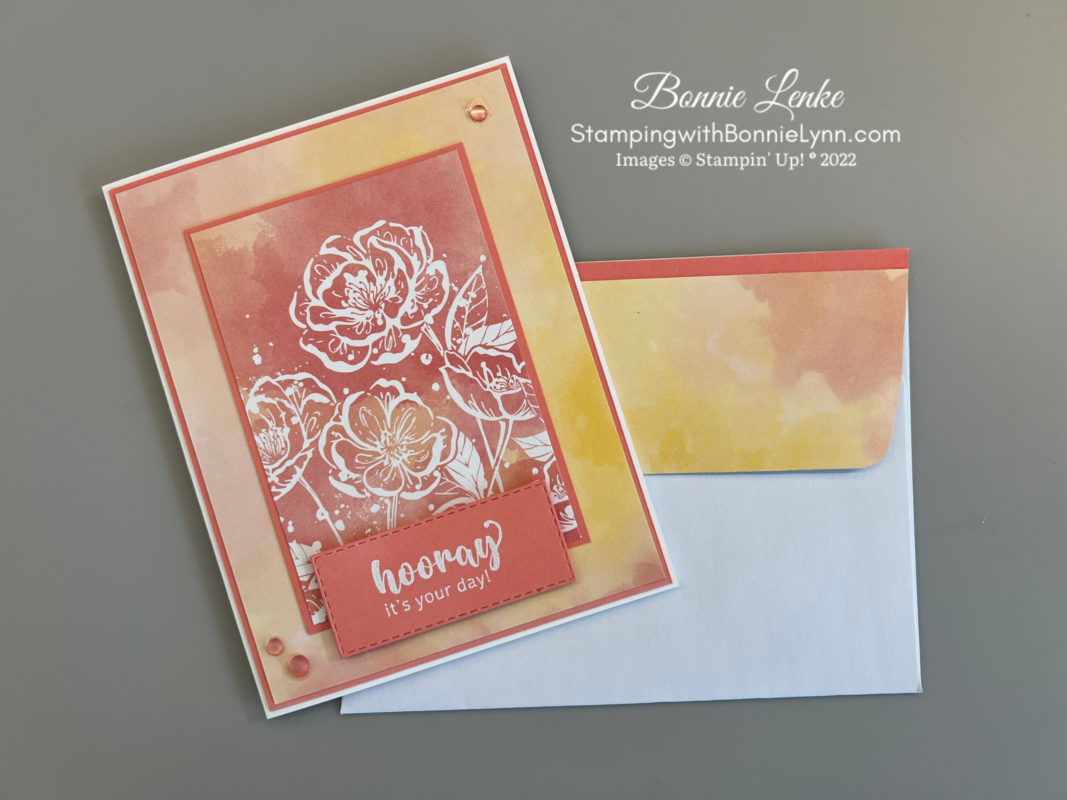
Welcome to Quick & Simple Friday Stamping. Today we are featuring the Inked & Tile stamp set with the Inked Botanicals Designer Series Paper. You might think this card doesn’t look simple but it is. You just need to make 3 measurements of the right side of the card front and then use those marks to cut off two corners.
The Inked & Tile stamp set and coordinating DSP are retiring at the end of the month and both are still available in my online store. This is a wonderful stamp set and I’ll miss making cards with it for my blog. Happy Stamping!
Card Directions
- Cut and score all cardstock and papers as listed under Cutting Directions below.
- Fold the Basic White Thick Card Base in half on the score line, and burnish it with a Bone Folder. The short side is the card front. On the right side edge make a pencil mark at 2-3/4”. On the top and bottom, measure 1” from the right side and mark with a pencil. Line up the 1” mark and the 2-3/4” mark in the paper trimmer, and cut off the corner. Repeat on the other side. See the picture below of the card base for pencil marks.
- Ink flower stems with Lost Lagoon Marker (or use the ink pad with dauber) and flower heads with Moody Mauve Marker. Stamp on the card front.
- Stamp big leaves and small flowers in Lost Lagoon Ink, stamping off on scrap paper twice for a very light shade.
- Stamp greeting in Basic Gray Ink.
- Cut Moody Mauve Cardstock to 3-3/8” x 5-1/2”. You are going to mark and cut this just as you did in step #2. On the right side edge make a pencil mark at 2-3/4”. On the top and bottom, measure 1” from the right side and mark with a pencil. Line up the 1” mark and the 2-3/4” mark in the paper trimmer, and cut off the corner. Repeat on the other side. See the picture below of the card base for pencil marks. Adhere to the back of the card front.
- Cut Designer Series Paper to 4-1/4” (maybe a hair less) x 5-1/2”. Layer to the back of the card front behind the Moody Mauve Cardstock.
- Tie a bow out of the Moody Mauve 2023-2025 In Color Jute Trim and adhere to the card front with a Mini Glue Dot.
- Embellish card with 2023-2025 In Color Dots.


Card Recipe
Cutting Directions:
- Basic White Thick: 7-3/8” x 5-1/2”, scored at 4-1/4” (card base)
- Moody Mauve: 3-3/8” x 5-1/2” (card front), 4” x 5-1/4” (inside)
- Basic White: 3-3/4” x 5” (inside)
- Inked Botanicals Designer Series Paper: 4-1/4” x 5-1/2” (card front)
Supplies Used:
- Stamps: Inked & Tile
- Cardstock/Paper: Basic White Thick, Basic White, Moody Mauve, Inked Botanicals Designer Series Paper
- Stampin Pads: Basic Gray
- Stampin’ Write Marker: Lost Lagoon, Moody Mauve
- Embellishments: 2023-2025 In Color Dots
- Ribbon: 2023-2025 In Color Jute Trim
- Adhesives: Dimensionals, Mini Glue Dots, Stampin Seal, Liquid Glue
- Tools: Paper Trimmer, Clear Blocks, Take Your Pick, Bone Folder, Stampin Pierce Mat, Paper Snip Scissors, Pencil
Paper Share & More For The 2024 – 2025
Stampin’ Up! Annual Catalog

The new Stampin’ Up! 2024-2025 Annual Catalog is around the corner! To help get as many new products in your hands as possible I’ve set up a Product Share!
What is a Product Share you ask? The paper shares a sample of all of the new Designer Series Papers & Specialities Papers from the 2024-2025 Annual Catalog. The Embellishment & Ribbon share includes a sample of all new embellishments & ribbons in the new 2024 – 2025 Annual Catalog.
FREE THOUGHTFUL WISHES KIT WITH $50* ORDER

MAY 2024 ORDERING SPECIAL:
Place your online order of $50* or more in May 2024 with the host code SHFCTEUM, and you will receive:
1) A FREE class packet to make FOUR CARDS using the Thoughtful Wishes & Bundle & Simply Said Stamp Set! Everything possible will be cut, punched, embossed, and die-cut for you! You’ll just stamp and assemble with your stamps. I always email you a written tutorial with photos and measurements, too! You’ll receive your card supplies in the following month.
*Order amounts before tax & shipping.
Check out this month’s Specials:
Click on an image for more information…
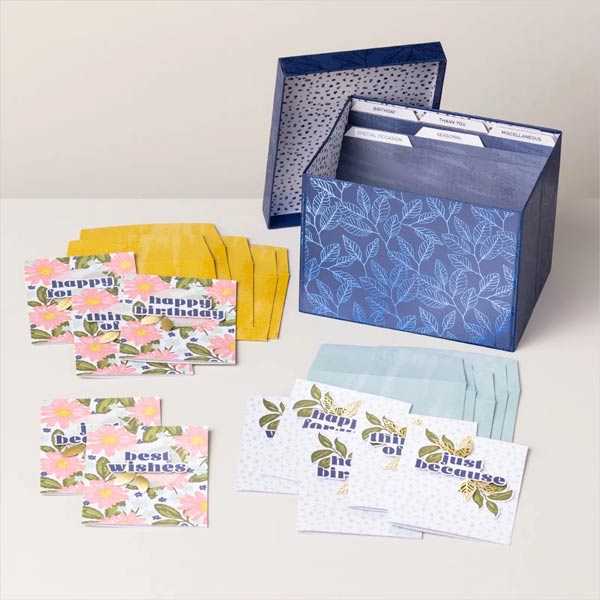
Card Keeper Kit