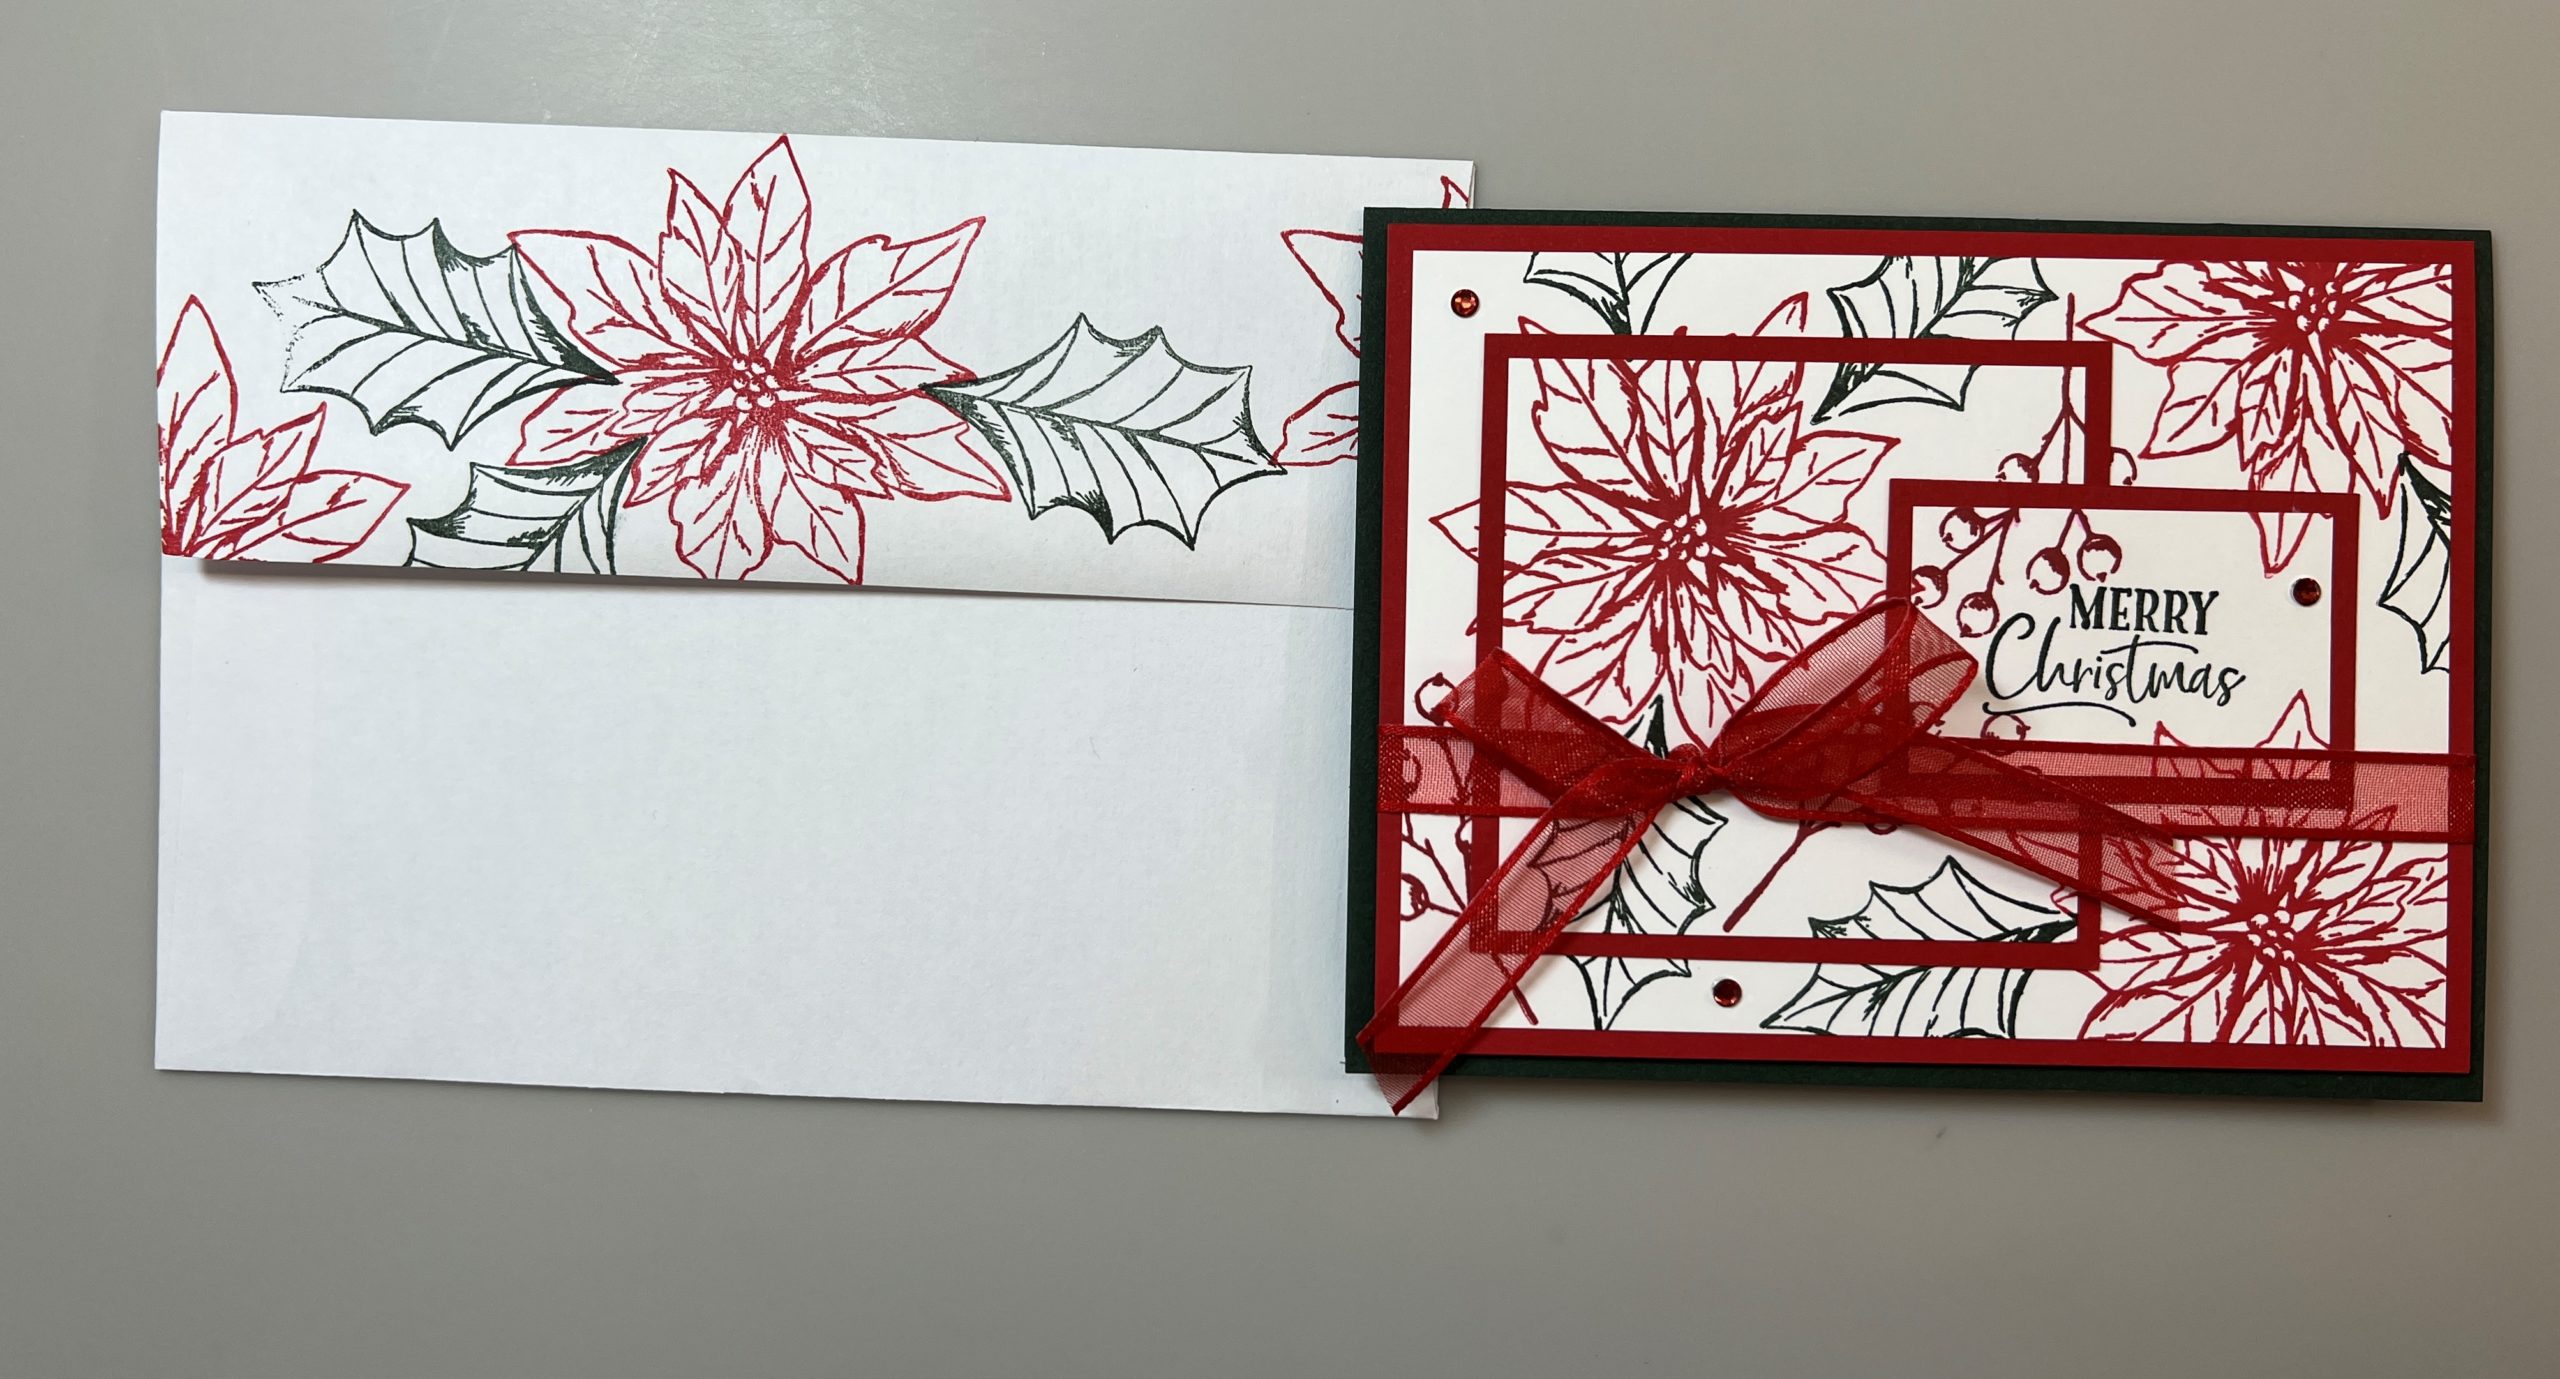
Merriest Moments White & Red Card & Video

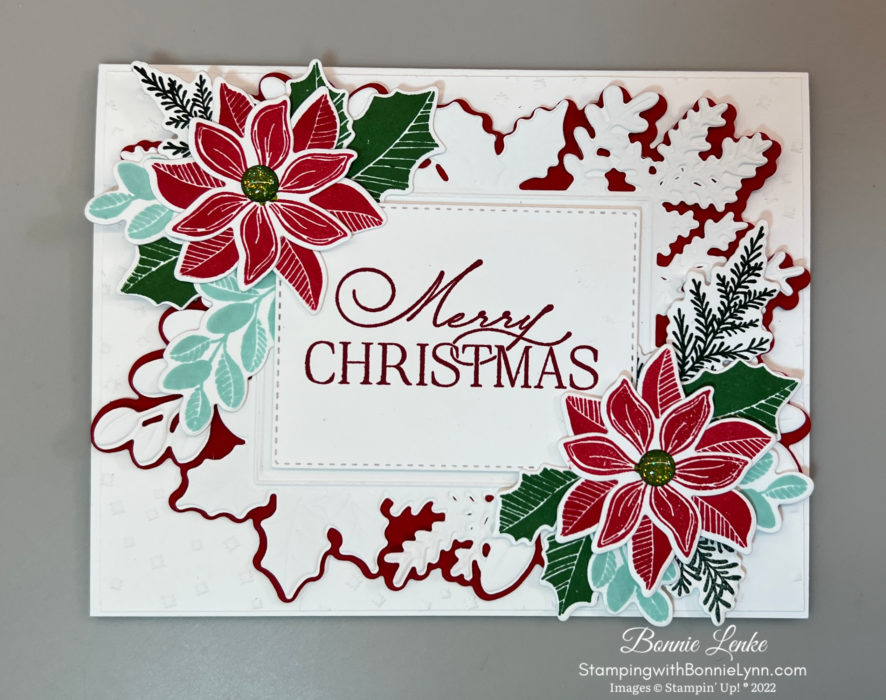
Stampin’ Up Merriest Moments stamp set along with the Merriest Frames Hybrid Embossing Folder is still a favorite of mine, I really like it. Today I’m sharing another card and video showing a red underlayment between the detailed cut & embossed piece and the embossed background. If you scroll down you’ll find a landscaped version of this card. You’ll also see one where I forgot to add the Real Red Underlayment, even our mistakes are beautiful.
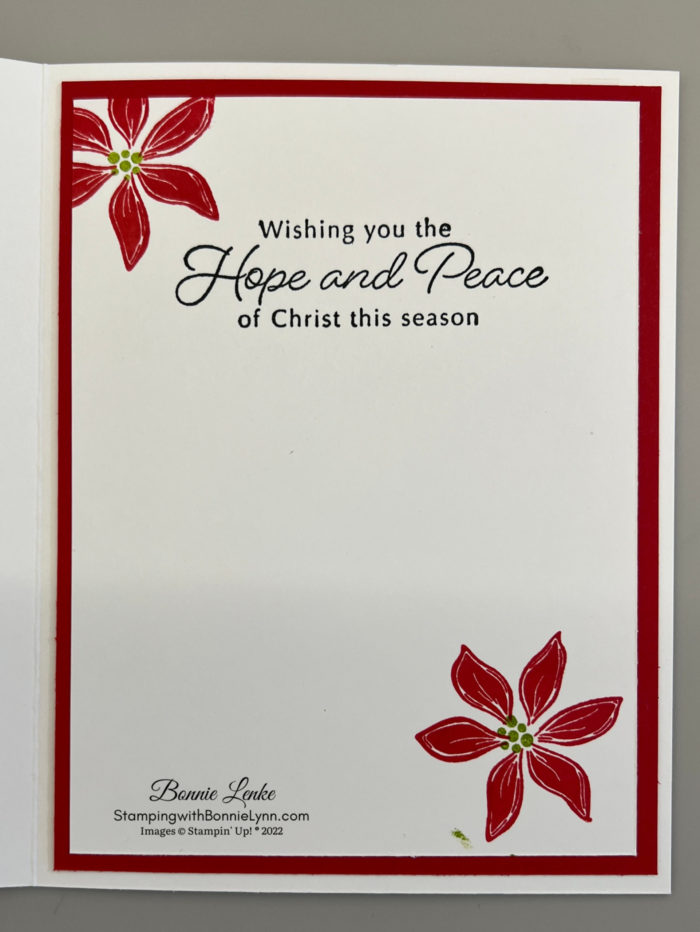
The poinsettia’s are very lovely and I love all the different looks of foliage to go along with them. The saying in the card above is from the For Unto Us stamp set, retired from the 2020 holiday catalog. I look forward to discovering with you what I come up with next with this set and maybe combining it with another one. I hope you enjoy this card as much as I enjoyed making it.
CLICK FOR MERRIEST MOMENTS VIDEO
Let’s Get Started
- Cut your card base 5-1/2” x 8-1/2” and score on the long side at 4-1/4”. Cut the rest of your cardstock and designer series paper (DSP) according to the sizes listed below under “Cardstock”.
- Fold your Thick Basic White Card Base in half on the score line and burnish with Bone Folder.
- Emboss one of the 4-1/4” x 5-1/2” White panels with the Merriest Frames Embossing Folder and adhere to Card Front.
- Cut out the Real Red Cardstock with the large open Merriest Frame Die that is basically the same shape as the detailed cut out. Adhere to Card Front.
- Using the large detailed die cut out the other White Cardstock panel. Line the cut out piece up with the design in the corresponding Hybrid Embossing Folder and run through the Cut & Emboss machine. Add adhesive to the underneath side of the center rectangle and adhere to card front matching the shape with the Real Red Piece on the step above.
- Stamp the Greeting from the Hope & Peace Stamp Set with Real Red Ink and cut out with the rectangle die from the Merriest Frames Dies. Add to card front with Dimensional’s.
- The Pointsettia’s where stamped in Real Red Ink, Boughs in Pool Party Ink, Pine Branches in Evening Evergreen and Holly in Garden Green Ink. Die cut each item with the coordinating dies.
- Add the cut out greenry and poinsettia to the upper left hand corner with Glue Dots and Dimensionals. (Hint: lay out the way you want them to go and adhere from the bottom up). The center of Poinsettia is finished with a Brushed Metallic Adhesive-Backed Dot.
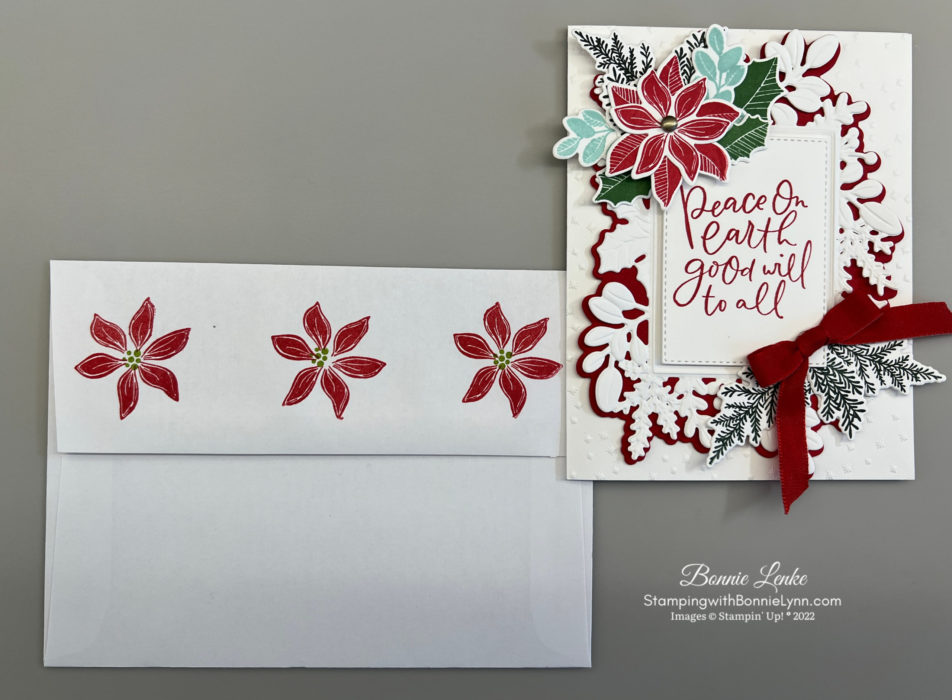
- On some cards I also added the greenry and floral to the bottom right corner. On the one I did on the video I added greenry and a Red Ribbon. So many choices…
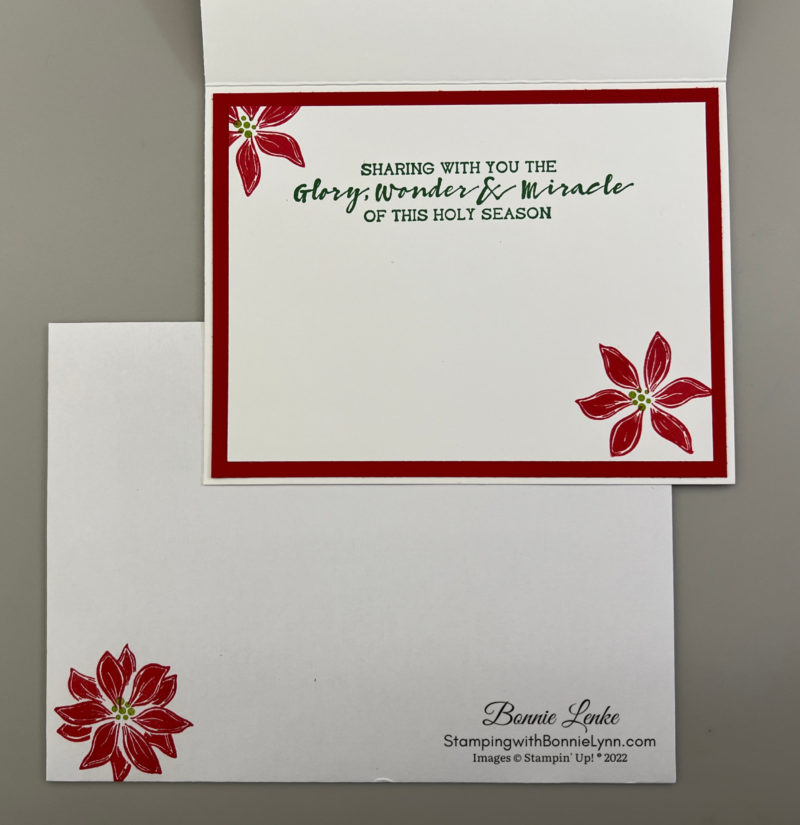
- The inside of card was finished with the saying stamped in either Garden Green or Evening Evergreen Ink. The Poinsettias were stamped in Real Red Ink.
- Finish the Envelop with a Poinsettia stamped in Real Red Ink on the lower left side. I stamped the dot centers on the poinsettias in Granny Apple Green Ink. On the envelope flap either stamp more poinsettias or add Boughs of Holly Designer Series Paper to it.


Think of You Inside Verse 
Peace Inside Verse 
Landscaped Version 
Landscaped Inside & Envelope Front 
Envelope Back


And now you have a beautiful card to brighten a special someones Christmas Season.
Happy Stamping!
PRINT MERRIEST MOMENTS DIRECTIONS
Card Recipe
Cardstock:
- Thick Basic White: 5-1/2”x 8-1/2” scored at 4-1/4”
- Basic White: (2)4-1/4” x 5-1/2” (cut detailed frame & Embossed background), 3-1/4” x 2-1/2” greeting, 8-1/2” x 5-1/2” for stamping, 3-3/4” x 5” inside.
- Real Red: 4-1/4” x 5-3/4” (red underlayment), 4” x 5-1/4” (inside)
Supplies Used:
- Stamps: Merriest Moments, Hope & Peace
- Dies: Merriest Frames Hybrid Embossing Folder
- Cardstock/Paper: Thick Basic White, Basic White, Real Red
- Stampin Pads: Real Red, Garden Green, Pool Party, Evening Evergreen, Granny Apple Green.
- Embellishments: Brushed Metallic Adhesive-Backed Dots, Real Red & Garden Green 3/8” Combo Ribbon Pack
- Adhesives: Dimensionals, Glue Dots, Liquid Glue, Tear N Tape, Stampin Seal
- Tools: Paper Trimmer, Cut & Emboss Machine, Stamparatus, Clear Blocks, Take Your Pick, Bone Folder, Stampin Pierce Mat, Paper Snip Scissors
CURRENT HOST CODE ZU2TGXSX
Earn Reward Points quickly for a $25 Credit
When placing an order please use the current Host Code* and earn REWARD POINTS. Once you earn 10 reward points you will receive a $25 shopping credit from me. CLICK HERE for more details.
*NEWEST HOST CODE is always located on the right side of webpage midway down.
STARTER KIT PROMOTION FROM STAMPIN’ UP! OCTOBER 4th – 31st
October is a fabulous time to join Stampin’ Up! New team members will get even MORE FREE products in their customizable Starter Kit. Between 4–31 October, those who sign up can get $155 worth of products for only $99 + free business supplies + free shipping + all the fun being a part of Stampin’ Up! and my team, Starlight Crafters.
STARTER KIT + PROMOTION DATE: OCTOBER 4-31, 2022
- A new demonstrator can select any eligible Stampin’ Up! products up to the stated value.
- The Starter Kit also includes business resources like catalogs, brochures, order forms, and postcards.
- In addition to the amazing added value to their Starter Kit, when new team members join Stampin’ Up! they get to be a part of our amazing community of crafters. Plus, they get to enjoy sharing simple and fun crafting experiences with others, early access to products, and exclusive access to training events.
- The Starter Kit also includes a FREE past Paper Pumpkin kit.
- When you join Stampin’ Up! you get to be a part of our amazing community of crafters. You get to share fun crafting experiences with others, have early access to new products and exclusive access to training events.
- There is no requirements to hold events, share online or sell in any way to others. You can join and simply get the awesome Starter Kit + deal and then get a minimum of a 20% discount on anything that you purchase as a Demonstrator.
- New demonstrators who submit their Independent Demonstrator Agreement (IDA) before October 4th or after October 31st will not be eligible for this offer.
CLICK HERE TO JOIN MY TEAM – Starlight Crafters